
How to: Subcutaneous Injection
Traditionally, intramuscular injections were always used when injecting testosterone. This is partly because large volumes were injected into the muscle and left a ‘depot’ of oil. This means that the testosterone is released over time from the ‘depot’ or store of oil left in the muscle tissue.
More recent research into testosterone dosing has indicated that more frequent, smaller dosing results in less side effects and improved, steadier testosterone and estrogen levels. Smaller injections are therefore warranted, and subcutaneous testosterone injections have become more common.
Which is best – intramuscular or subcutaneous testosterone injections?
Subcutaneous testosterone injections are now the preferred way to inject testosterone cypionate. This is for a few reasons.
It is safer as there is less chance of injecting testosterone oil into a blood vessel.
It is easier to teach.
The injection site can be seen more easily.
They cause less muscle damage and scar tissue.
Some evidence suggests they require a lower dose to achieve the same level of testosterone as Intramuscular.
The testosterone is released more slowly and therefore leads to less estrogen, DHT and hematocrit spikes. All three of these things can increase side effects from TRT.
Intramuscular injections are still preferred over subcutaneous testosterone injections for some patients.
How to safely do a subcutaneous testosterone injection
Step 1: Find a comfortable, well-lit place to sit and clean your work area
Firstly you will want to arrange everything you will need for injecting so that you have everything ready in front of you and don’t need to touch anything which isn’t clean after washing your hands. For testosterone cypionate you will require:
1 vial of testosterone cypionate
1 filter needle (21G 1 inch length) with a syringe
1 injecting needle (25G, 27G or 30G 0.5-1 inch length)
1 or 2 alcohol wipes
Sharps bin for disposing of needles and syringes
Check the expiration date on the medication. Do not use medication with particles, medication that is discolored or has expired.
Wash your hands thoroughly with soap, and dry off with paper towel or kitchen roll if possible.
Hand washing is one of the most important things you can do to prevent infection.
Step 2: Selecting and Preparing the Injection Site
Option 1 - Injecting subcutaneously into the belly fat
Injecting into the belly fat area is recommended as it doesn’t have any structures such as blood vessels and nerves close to the skin. It also tends to have a decent layer of adipose (fat) tissue under the skin so that you do not accidentally inject too deep past the subcutaneous layer. The belly area is also easily accessible and viewable to allow easy injections.
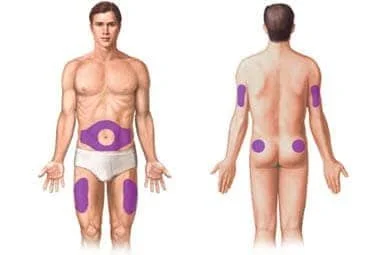
These are the areas you can inject subcutaneously. We recommend the abdomen area in purple around the belly button.
Option 2 - Subcutaneous injection in the thigh:
Injecting subcutaneously into the thigh can be slightly less comfortable than the belly fat and for most men it is harder to achieve due to less body fat in this area.
Look at your thigh and divide it horizontally into 3 equal parts. The injection will go in outer middle third.
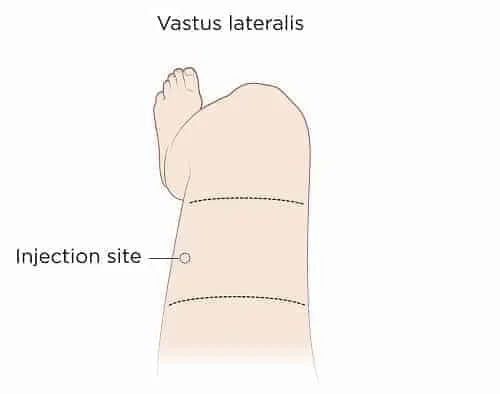
This area is midway down the first part of the thigh – between your knee and hip. It is not best for men with lower body fat levels but may be worth considering if you are rotating injection sites.
Step 3: Preparing the Injection Dose
Check over the packaging of the syringes and needles you are going to use and make sure they have not been opened or damaged. If they have been they are not sterile and should not be used.
Take the cap off the vial. Clean the rubber stopper with one alcohol swab.
Open the syringe and needle packages carefully. Be careful not to touch the open end of the syringe or needle against anything, including your hands.
Pull the 21G needle cover straight off the needle. Do not let the needle touch any surfaces.
Then, pull back the plunger and draw air into the syringe. The amount of air drawn into the syringe should be the same amount (mL or cc) as the dose that your doctor prescribed.
Keep the vial on your flat working surface and insert the needle straight down through the rubber stopper. Do not put the needle through the rubber stopper more than once.
Push the plunger of the syringe down and inject the air from the syringe into the vial.
Keeping the needle in the vial, turn the vial upside down. Make sure the liquid is covering the tip of the needle.
Keeping the vial upside down, slowly pull back on the plunger to fill the syringe with the medication to the number (mL or cc) that matches the dose your doctor prescribed.
Keeping the needle in the vial, check for air bubbles in the syringe. If there are air bubbles, gently tap the syringe with your fingers until the air bubbles rise to the top of the syringe. Then slowly push the plunger up to force the air bubbles out of the syringe.
Keeping the tip of the needle in the liquid, once again pull the plunger back to the number on the syringe that matches your dose. Check again for air bubbles. If there are still air bubbles, repeat the steps above to remove them. The air in the syringe will not hurt you, but air bubbles that are too large can reduce your dose of medicine.
Check again to make sure that you have the correct dose in the syringe. It is important that you use the exact dose prescribed by your doctor. Remove the syringe from the vial but do not lay it down or let the needle touch anything.
Remove the 21G needle and replace it with the 27G, 29G or 30G, 0.5-1 inch needle. You should leave the needle cover on until you are ready to give the injection.
Make sure that the dose in the syringe is the dose prescribed by your doctor. Ask your doctor if you’re not sure.
Step 4: Injecting the testosterone subcutaneously
1. Wipe the injection site skin with an alcohol swab; then let it dry in the air.
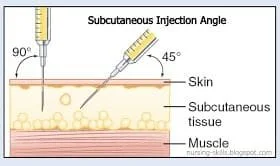
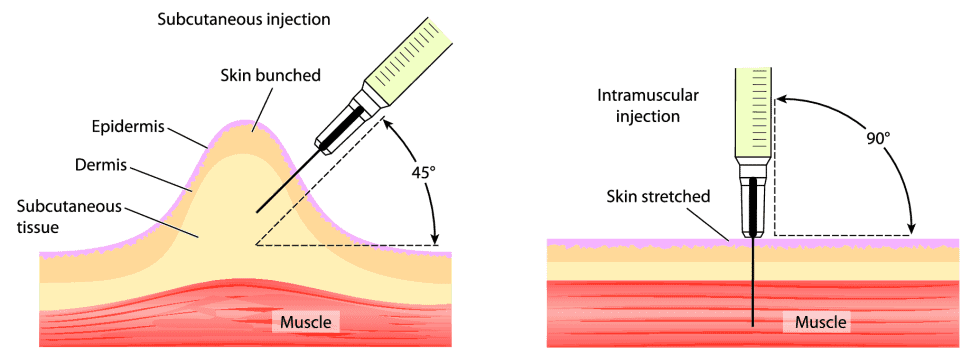
2. Slightly hold the skin around (don’t pinch too hard) so that the skin is away from the muscle beneath – ensuring a subcutaneous injection.
3. Using one quick and firm motion, insert the needle into the belly fat at a 45 degree angle.
4. There is no need to ‘aspirate’ with a subcutaneous injection. You can slowly push down on the plunger to complete the injection.
5. When you finish injecting the full dose of the medication subcutaneously, remove the needle slowly and at the same angle that you inserted the needle. There may be a small amount of oil and/or blood that comes from the hole. This is nothing to be alarmed about.
6. Gently wipe the area of the injection with an alcohol wipe and dispose of the needle and syringe in a sharps bin or a hard-plastic container with a screw top.
Tips for Reducing Subcutaneous Testosterone injection irritation
Inject medicine that is at room temperature.
Let the skin dry after using alcohol wipes before injecting.
Break through the skin quickly with the needle – don’t slowly press it in.
Don’t change the direction of the needle as it goes in or comes out.
Do not reuse disposable needles – this increases infection risk and blunts the needle causing trauma and pain.
Instructions for Disposing of 'Sharps' (needles):
Improper disposal of syringes and other sharp objects can pose a health risk and damage the environment. Please always dispose of your used syringes and needles using a sharps bin.
The sharps box should then be disposed of in line with the following FDA guidelines: https://www.fda.gov/medical-devices/safely-using-sharps-needles-and-syringes-home-work-and-travel/dos-and-donts-proper-sharps-disposal